
Doom has always been a very versatile game, featuring some of the most moody and memorable single player campaigns, as well as a thrilling, rewarding and skill-centric multiplayer experience. Cooperative and Deathmatch never seem to get old, especially considering the thousands of wads present on idgames and other sources. Many new game modes have been added, such as Capture the Flag, Survival (lives mode), and other specialty gamemodes depending on which source port you use.
To get started, you'll need a source port. The three most commonly played online are Odamex, Zandronum and ZDaemon. To get the widest selection of Doomability, I suggest downloading all three (they're all quite small.) Place all of your IWADs (doom.wad, doom2.wad, freedoom.wad etc) in each program's directory. Configuring controls and setting player name/color is simple in all three.
Now you'll need a program to browse servers. Doom Explorer is a commonly used program, compatible with the “big 3” and featuring built in IRC. Doomseeker is another stable and easy to use server browser that comes included with Zandronum. *Please note that this tutorial was written using the outdated IDE, but the concepts apply just as well to Doom Explorer and Doomseeker.
If you wish to start your own servers, The Sentinel's Playground is a free Zandronum hosting service. It is easy to use and very flexible.
If you intend on hosting a public server from your own PC, you will
need to forward ports! Here, you can find a helpful
article on port forwarding. Many
servers use ports 10666 and 10667. IDE and
Doomseeker both serve as easy ways to launch your
custom server for the world to see.

Step 1:
Set your program directories. Open IDE and Click the
options tab at the top. On the left hand column,
you should see Directories, and underneath Programs
and Wads. Click 'programs', and you'll see this:
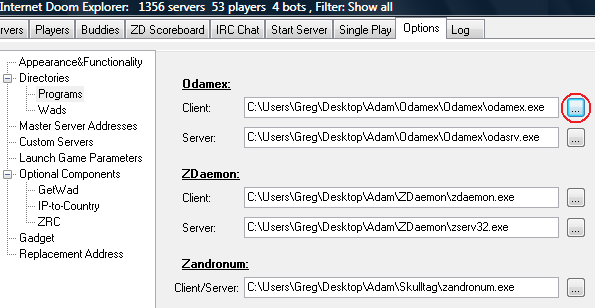 Click '...' to find your client and server
for each source port.
Click '...' to find your client and server
for each source port.
Step 2:
Set your preferences. To do this, click the
'Launch Game Parameters' option at the left.
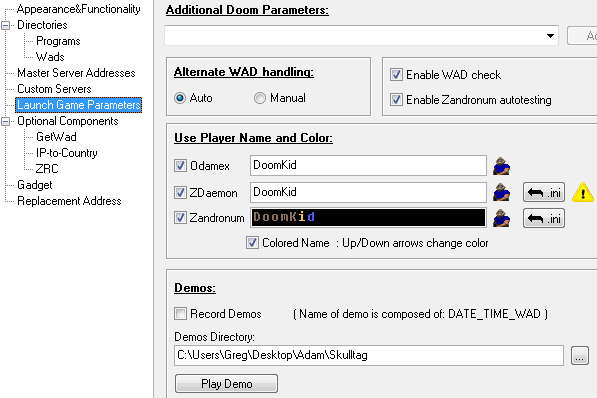
Here, you can enter your online username and set your player color by clicking the marine icon.
You can set these to be different for each port, and Zandronum features colored text in your name, if you wish. I recommend enabling WAD check and Zandronum autotesting. You can also choose to record demos of your online matches.
Step 3:
Set your wad directories. On the left hand side,
click 'Directories, then click 'Wads'.
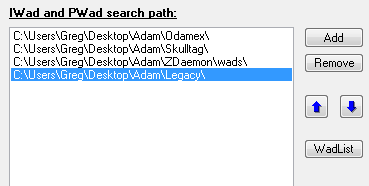 Click the 'Add' button. Here, I recommend adding
each source port's directory, as well as your main
PWADs folder, if you have one.
Click the 'Add' button. Here, I recommend adding
each source port's directory, as well as your main
PWADs folder, if you have one.
Step 4:
Configure GetWAD. One of the best things
about playing Doom online is experiencing all of the
awesome user made content. GetWAD easily grabs the
file you're looking for from the web and lets you
connect with ease.
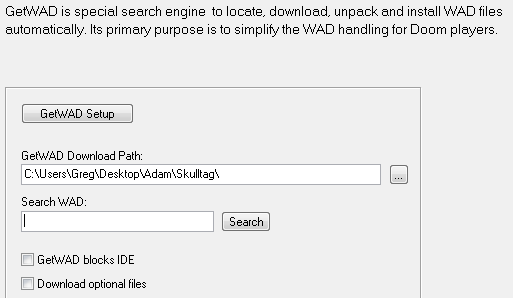
On the left hand column, under 'Optional Components', click 'GetWad'. Here you configure where new wadfiles will be downloaded to. You must select one of the directories you chose on step 3, so IDE knows where to look when launching your game with custom WADs. Most servers use custom wads, so this is an important aspect of setting up your browser.
Step 5:
Configure your server list. This will control how
servers appear to you and make it easier to find the
exact game you're looking for. Click Appearance
& Functionality on the left.
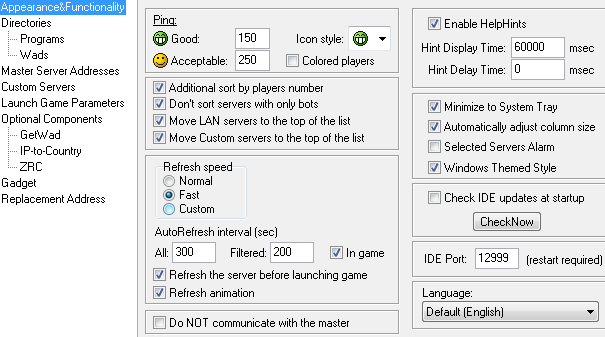
I generally check 'Additional sort by players number' because it's no fun to play alone and 'Don't sort servers with only bots' because bots are usually annoying/intrusive. I also check 'Refresh the server before launching the game' to see if the server has emptied out or filled up as you connect.
Step 6: Set up your ZDaemon account. ZDaemon has the unique feature of keeping score for many Deathmatch and Duel servers.
Setting an account up is very simple. Click the 'ZD
Scoreboard' tab at the top of your IDE client.
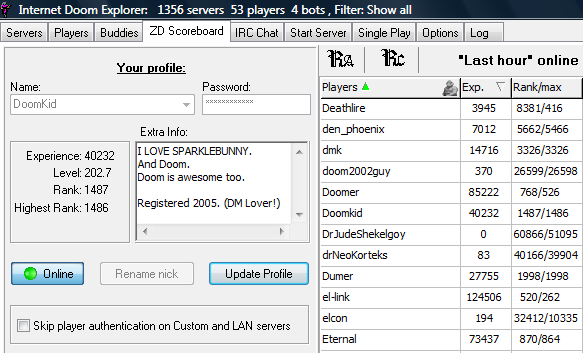
Here, you can set your name, password and personal blurb and create an account on the spot. Make sure your ZDaemon player name matches the name you selected in the 'Launch Game Parameters' on step 2.
Now you're ready to frag!
Click the
'Servers' tab at the top. Click 'Players' to sort by
number of players, 'Ping' to sort by connection
quality, and so on - sorting servers is a breeze.
Make sure you have all 3 ports enabled!
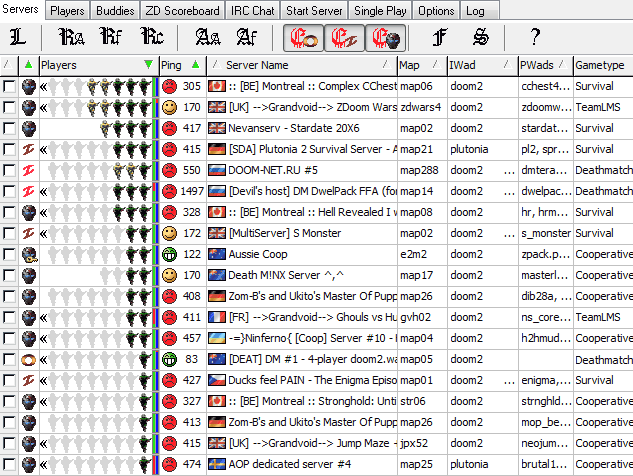
Double click any server, allow GetWAD to download the custom files (if necessary) and frag away!

Click here for instructions on playing ZDoom netgames.
ZDoom users cannot join in
the middle of a game, all clients must be ready at
the time of startup.
DOSbox is a program capable of running the real DOOM.exe and DOOM2.exe via DOS emulation.
This tutorial assumes you have dosbox installed, your Doom/Doom2 files are located in C:\DOOM (or C:\DOOM2), and if behind a router, you have opened ports.
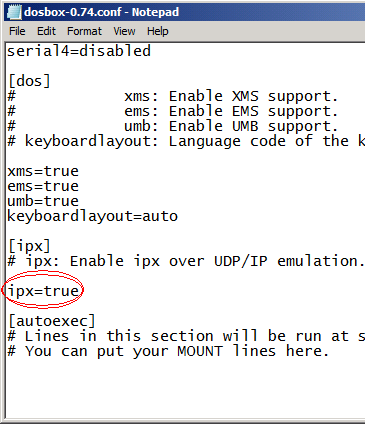
To
allow connectivity, you have to go into your DOSbox
folder and find a file called dosbox.conf or Dosbox
0.74 Options.bat. Open this and it should bring you
to notepad/a text editor. Scroll near the bottom, and
you should see ipx=false. Change this to ipx=true.
On the
hosting PC, type ipxnet startserver port, port being
the UDP port you want to host with.
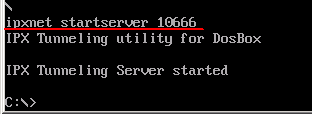
On the connecting PC, type ipxnet connect ip port, putting the host computer's IP address in place of 'ip', and using the opened port specified on the host's PC. This works over the internet as well as on a local network, so if someone has put up an internet server (as fraggle sometimes does), type the IP and port which they have specified. Note: The IP and port must have a space between them, not a : used by most modern source ports.
It is possible to load custom files, and play DM through the -deathmatch parameter. Revision 22/03/2016 - Thanks to doomworld user xttl, tidcdup and extratics are now usable under dosbox! Great for those who have a high ping. Read what he has to say below:
Quote: "Vanilla Doom supports ticdup but vanilla ipxsetup and sersetup do not. I think it was originally implemented in the engine for DWANGO only (DWANGO always used ticdup 2 AFAIK) so the other network drivers were never updated. Here is a modified ipxsetup I just compiled. It supports these extra command line parameters: -dup # sets ticdup # (1-9), default 1 -extratics # sets extratics to # (0-8), default 0 -extratic sets extratics to 1 -player # force your player number to # in game (1-4) -exe name try to launch name instead of doom or doom2
Note that there is no error checking done for the case where more than one node has specified the same player number and if you do so, it will cause the game to hang on startup. Also, if one node is using -player, then all nodes will have to use it because otherwise the automatically (based on IPX network address) assigned player number of one node may be the same as a manually specified one of some other node.
When using ticdup you have to adjust your mouse sensitivity accordingly. ZDoom and Chocolate Doom may do this for you (I'm not sure) but vanilla does not. For -dup 2, halve your sensitivity. For -dup 3, divide it by 3 and so on.
Btw. in the original ipxsetup source extratics was
always being set to 1! But the sources are not for
the version that came with the newest Doom releases
anyway... (this version doesn't show the blue window
when looking for nodes, for example)"
(Thanks a bunch, xttl!)
Chocolate Doom is an excellent port by fraggle that emulates playing DOOM.exe, without the need for DOSbox eating up your CPU. Choco Doom sends data through a server rather than the peer-to-peer system used by Vanilla Doom and features improved client synchronization code, giving you a smoother game than you'll get through Vanilla Doom. (It's also generally easier to set up than a DOSbox match.)
One player must act as the server and host the game. To run a Chocolate Doom server over the internet, you need to know your public IP address. (Some broadband routers use NAT, so the IP address you see in your OS may not be the same as your public IP address.) This link will tell you your public address.
When you run a Chocolate Doom server, it is automatically registered with the master server. Other players can use the setup tool to find your server, or you can check for the address on the website for the master server. If the server doesn't appear on the list, it's probably because you haven't set up the port forward for your NAT router properly.
Start a multiplayer server by running with the -server command line option. For example, to start a server for a deathmatch game, type chocolate-doom -server -deathmatch.
Other players can then connect to your server using the -connect command line option. For example, if the server's public IP address is 1.2.3.4, type chocolate-doom -connect 1.2.3.4.
When
the server is started, you will see the waiting
screen which lists all players currently connected.
Once all players are present, click the "start game"
button (or press space bar) to start the game!

Just want to frag 1v1 with a friend? Doom Legacy has optional splitscreen to curb those deathmatch pangs. I use version 1.42 for Windows thanks to it's stability and excellent launcher, alongside the program XPadder, so we can use Xbox 360 and Playstation controllers to frag the hell out of eachother!
Instructions on setting up XPadder can be found on xpadder.com
Once you have Doom Legacy set up, open the Launcher.
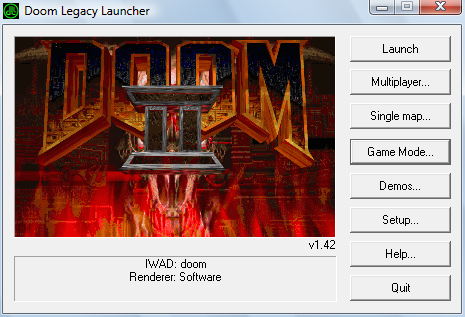
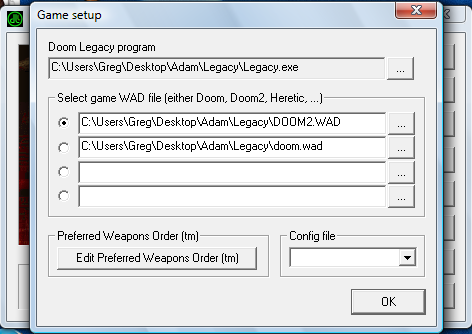
Click Game Mode. Here, you
will tell the launcher where your Doom Legacy program
is, as well as your IWADS. It is recommended to have the
IWADS and PWADS you plan to use in your Legacy folder.
Now, click Single Map, do not click Multiplayer.
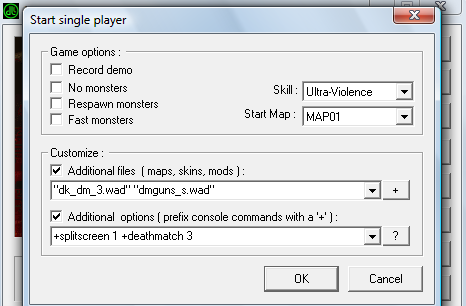
Here, you tell the Launcher how you want to play. In the Additional options field, type +splitscreen 1 and, if you want to Deathmatch, +deathmatch 3, as shown in the image above. You do not need to type a command to play cooperative games.
In the Additional files field, you can add different user made wads you wish to play. The wads should be in your Legacy folder.
Set each players controls (Press ESC, then select 'Multiplayer' to configure Player 2) and get killing!
Boot up Doom Legacy through the launcher with the WADs you wish to use. When the game starts, hit ESC, select 'Multiplayer' and select 'End Game'. It should bring you to the title screen. Press ESC, select 'Multiplayer', and select 'Start Server'. Here, you can set all of the game options - Turning monsters on and off, setting it as Deathmatch (1, 2 and 3 all have different weapon/item rules) or Cooperative, and setting the server name.
On the PC that will be connecting, start the game through the Launcher with the same WADs as the host. On startup, press ESC and select 'End Game'. Now press ESC, select 'Multiplayer', and 'Connect Server'. You should see the server name, select it and hit Enter. You should both be in the same server now!
To make the game 4 player, simply open the console on each PC by pressing ~ (located under ESC on most keyboards) and type "splitscreen 1". To set up player 2's controls, press ESC, select 'Multiplayer' then select 'Setup Player Two'. Once you're finished, you're ready to frag!